

why does oculus link keep disconnecting

Quest Link — once known as Oculus Link — is Meta'south style to connect Quest ii or Quest Pro headsets with a PC. Whether y'all're using it to play PC VR games, watch movies hosted on a PC, or work from a PC via virtual screens, Quest Link is a bang-up style to get going.
But, like any technology, there are spring to exist issues that you'll come up across from time to fourth dimension. The Oculus Quest ii and Meta Quest Pro (opens in new tab) can both connect to PCs either wirelessly or via a USB Blazon-C cable.
First off, to go the best experience with wireless Quest Link, you'll desire to ensure that you're using a fast Wi-Fi 6 router. But, if you're still having Quest Link issues, we've got a few solutions for you.
Quest Link randomly disconnects
Normally, people will find that the Meta Quest will randomly disconnect from the PC and revert to the Quest home screen. While yous might think this is caused by a bad cable or cleaved port, the solution is (thankfully) a lot simpler.
In society to fix this, you need to make sure to deny storage permission when connecting the cablevision. Any time yous connect the Oculus Link cablevision from your PC to the Meta Quest, you need to select Deny Storage Permission on the permissions pop-up dialog that appears on your headset.
In a nutshell, when yous permit storage permission, the headset is disconnecting the virtual reality interface whatever time Windows checks for new media files on it. That's a built-in characteristic in Windows when you connect cameras or phones to get pictures or video off of them, only information technology doesn't work and then well for a device similar a Quest.
Less often, a low-quality or slow cablevision could also cause disconnections. If you're still facing disconnection issues after denying storage permission, yous might want to first endeavor a different USB port. Similar cables, ports can become bad, especially if yous have a cable continued and it gets tugged besides hard.
Another option is making sure your driers are updated. Y'all should also always keep your drivers up to date by visiting the Windows Update section of your PC and downloading any new motherboard or display drivers. Out-of-date or incompatible drivers often crusade all sorts of issues.
If none of these solutions solves your random disconnection result, it may be time to pick up a new USB cablevision. The official Oculus Link cable is a great solution, as it's 15ft long and made of sturdy materials that can withstand abuse. The downsides are the cost, which is two-3 times the cost of almost other cables, and the fact that it's simply a USB Type-C cable. If you need a cablevision with a USB Type-A stop — that's the standard apartment USB port — nosotros've got some great picks for the best Quest Link cable alternatives (opens in new tab).
Incorrect height
From time to time, y'all may notice that your height is incorrectly calibrated when connecting to the PC, either making you super alpine or super short in VR. To fix this, you should just need to unplug your Quest Link USB cable and plug it back in. Typically, when this happens, the Quest didn't pass the room size information to the Oculus Rift software correctly.
Poor image quality on wired Oculus Link
Poor prototype quality on a wired Oculus Link setup is normally caused by a low bitrate, which ways that your PC is compressing the image before sending information technology over the cable to your Oculus Quest. And so long as yous're using a cable with USB 3 or greater data speed transfer rates, Quest Link software should default to a loftier-quality paradigm.
Lower-quality or slow cables with lower transfer speeds could cause the Quest Link software to downgrade the epitome quality. If swapping the cable out for a amend i isn't an option, you could always effort to conform the bitrate that Quest Link sends through the cable.
In order to adjust the bitrate, y'all'll need to employ the Oculus Debug Tool. It'due south not every bit scary as information technology sounds, I promise. Here are a few easy steps to follow:
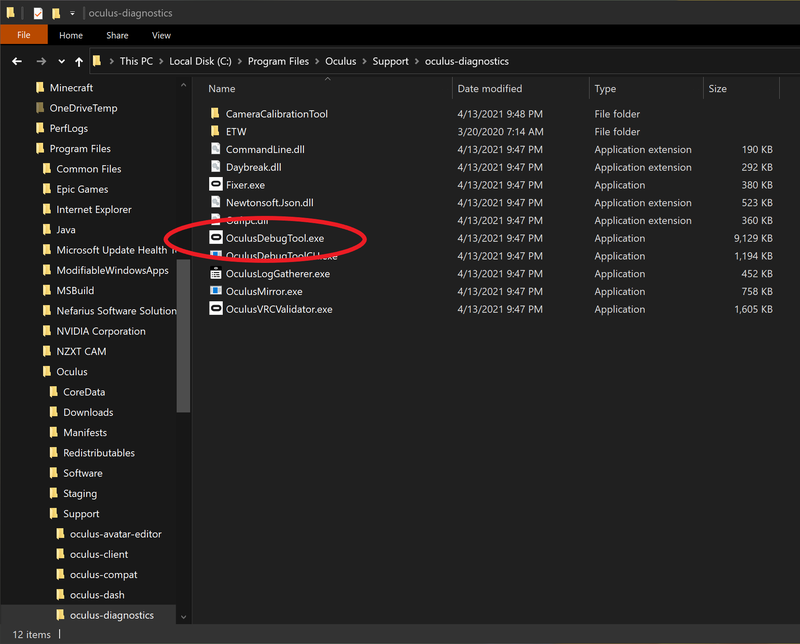
- Open upward File Explorer in Windows and navigate to **C:\Program Files\Oculus\Support\oculus-diagnostics**.
- Open up OculusDebugTool in this folder.
- Under the Oculus Link department, select Disabled next to Encode Dynamic Bitrate.
- Modify Encode Bitrate (Mbps) to 250.
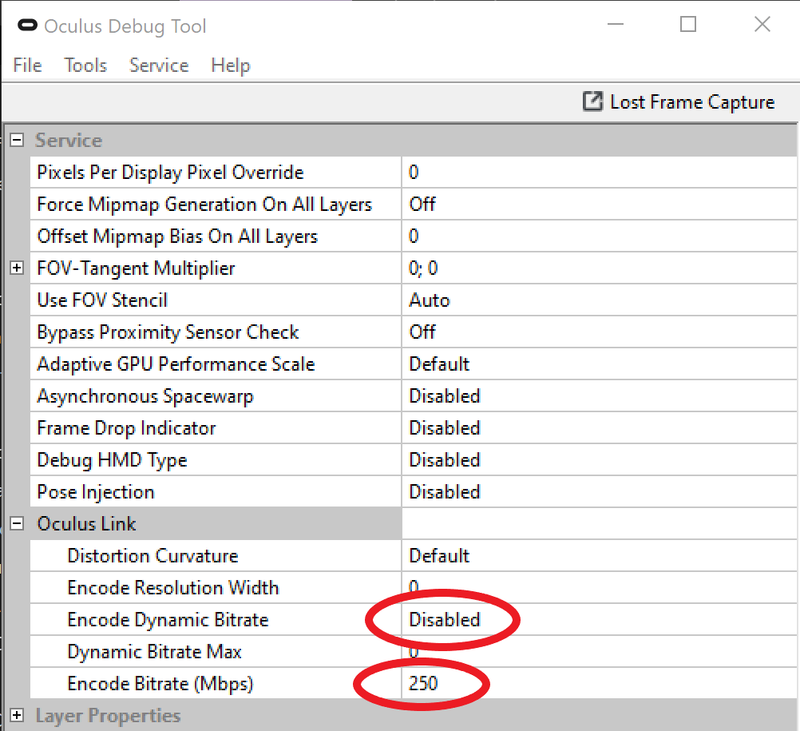
- Close the Oculus Debut Tool.
- Unplug your Oculus Quest and Plug it back in to restart the Oculus Link.
Your epitome quality should exist significantly improve than it was before. Meta suggests setting the bitrate no higher than 250Mbps, although the maximum number supported is 500Mbps. Yous tin can effort experimenting with values betwixt 250-500 to see if you lot find a quality change, although information technology'due south likely that you'll affect performance beyond 350Mbps.
Stuttering on wired Oculus Link
If your Quest Link experience has become stuttery or jumpy, you can endeavour a few things. First off, make sure your room has adequate light for the Meta Quest to track. Those cameras need light to come across the environment around them, and insufficient light will cause tracking issues.
If you're not using an official Quest Link cable, it'south entirely possible that the cable yous're using tin can't provide enough bandwidth for a consistent feel. If y'all've adjusted the bitrate manually equally in the steps above, go back and set Encode Dynamic Bitrate to enabled. This will allow the Quest Link software to automatically adjust the epitome quality based on available bandwidth, delivering a more consistent experience.
If you haven't adapted the bitrate before, y'all might need to lower the refresh charge per unit of the Oculus Link signal on the Meta Quest 2 or Quest Pro. The original Oculus Quest only supports i refresh charge per unit (72Hz), so this step only applies to Oculus Quest 2 and Quest Pro. To exercise that, follow these steps:
- On your PC, open the Oculus software.
- Select Devices on the left side, then select Meta Quest 2 or Quest Pro from the list of continued devices.
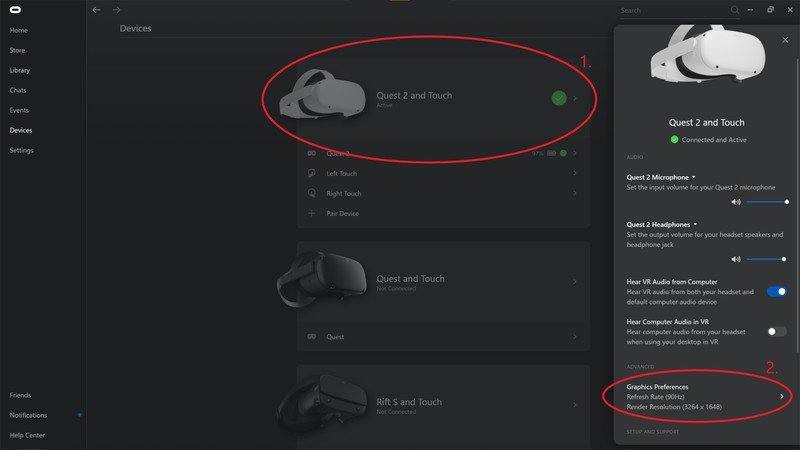
- On the card that pops upward on the right side, select Graphics Preferences.
- Select 72Hz to bring the refresh rate downward to its lowest possible setting.
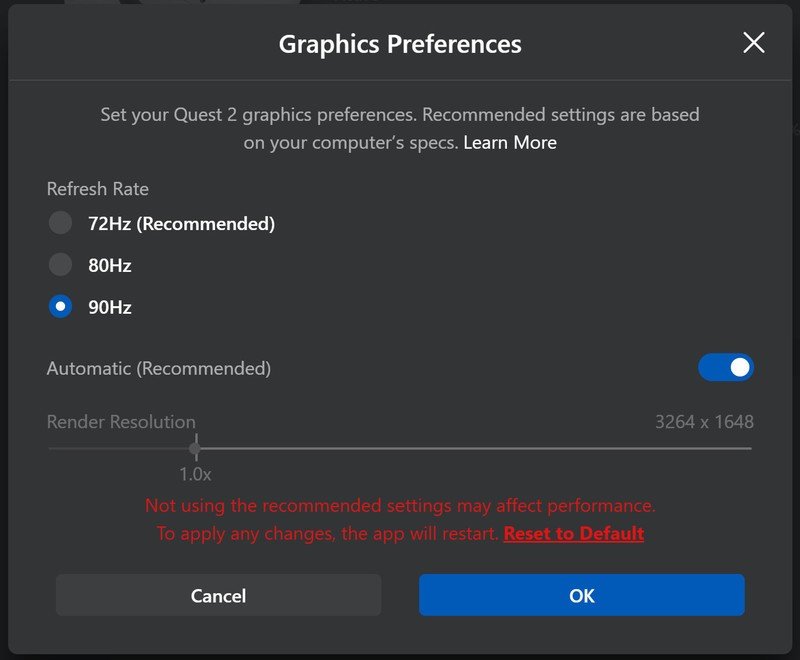
- If you're still experiencing issues, uncheck automatic resolution and scale the resolution lower than 1.0x.
- A lower resolution will deliver a softer image, but will ameliorate performance.
If you're still having trouble with stuttering, try updating your motherboard and brandish drivers. Otherwise, your PC may non be powerful plenty to play PC VR games without performance issues.
Poor prototype quality on Oculus Air Link
Quest Air Link is the easiest style to play PC VR games (opens in new tab) on your Meta Quest 2 and Quest Pro. Part of the magic of wirelessly transmitting PC games over your home's Wi-Fi network means that the Oculus Link software has to shrink the image quite a fleck to evangelize a consequent experience. That means, at times, the prototype may look incredibly soft, and fine details or objects on the horizon tin be hard to run into.
If you're suffering from these issues, effort adjusting the following options:
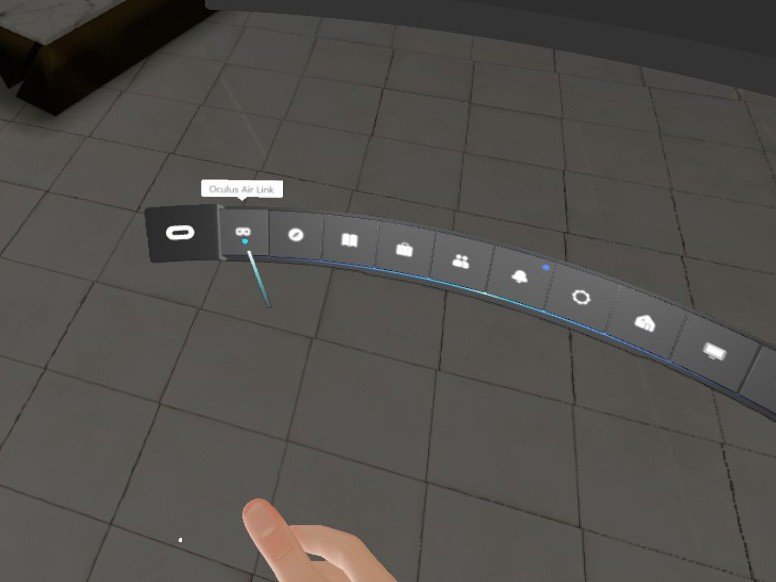
- Ensure your Quest two or Quest Pro is connected to your PC via Quest Air Link. You'll know you're in the right place because you lot'll exist in the Oculus Rift home, non your Quest dwelling house (they look very different).
- Printing the Home button on your correct controller to bring up the Oculus menu bar.
- Select the Quest Air Link push, located on the left side of the bar.
- In the Dynamic section, adjust the maximum bitrate that Air Link volition employ. A college bitrate means amend image quality.
- If you still see a dirty or soft prototype, select the Fixed option.
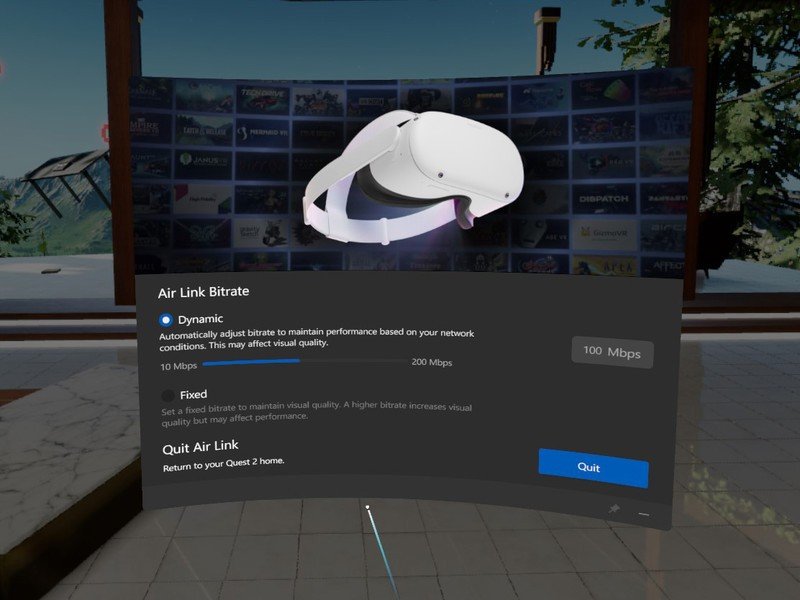
- Try starting at 100Mbps for fixed bitrate and run into if that improves prototype quality.
- Minimize the Air Link Bitrate window by selecting the minimize button on the bottom right corner of the window.
- Play something and encounter if your paradigm quality has been improved!
While Dynamic bitrate is dandy for slower Wi-Fi networks that might not be able to handle a consistent quality connectedness, a fast Wi-Fi half dozen network should exist able to handle much higher stock-still bitrate images that'll deliver better overall quality. If you increase the bitrate too much, yous'll notice the paradigm begins to stutter or boring downward, meaning you'll need to driblet the stock-still bitrate a flake to maintain a improve connectedness.
Stuttering on Oculus Air Link
While Air Link doesn't require any cables to be connected, its Wi-Fi-dependent nature means that several variables could crusade functioning problems forth the way. The kickoff matter you tin can practice is lower the bitrate that Quest Air Link uses to ensure a more stable connection.
- Ensure your Quest 2 or Quest Pro is connected to your PC via Quest Air Link. You'll know you lot're in the right place because you'll exist in the Oculus Rift abode, non your Quest dwelling (they look very dissimilar).
- Press the Abode button on your right controller to bring up the Oculus bill of fare bar.
- Select the Quest Air Link push, located on the left side of the bar.
- In the Dynamic department, arrange the maximum bitrate that Air Link will utilize. A lower maximum bitrate means lower prototype quality simply a more consistent connection.
- Minimize the Air Link Bitrate window by selecting the minimize push button on the bottom right corner of the window.
- We suggest selecting a setting lower than 100Mbps if you're encountering stuttering while playing.
- Play something and see if the stuttering is gone.
If you're nevertheless running into issues with stuttering, you might need to prioritize your Meta Quest 2 or Quest Pro and your PC on your domicile'south Wi-Fi network. This step isn't quite as piece of cake to layout, though, as it's going to vary wildly from router to router. On most router software — either the app or the spider web interface — you'll need to find the QoS or prioritize traffic section.
Most routers accept a devices section front and eye where yous can select a device and choose it every bit a priority over others. It may look something like this:

Setting a device as the priority means your router will ensure enough bandwidth is available for that device to run optimally. In the case of wireless Wi-Fi-powered VR, setting both your PC and your Meta Quest every bit a priority device on your router is important, every bit it's the best way to ensure a consistently smooth experience.
Otherwise, when network traffic gets busy — typically acquired past multiple devices in use or big downloads occurring on other devices on your network — your wireless VR traffic could become a lower priority for your router. Past setting these ii as priority devices, you tin can ensure that no other device in your home steals the bandwidth you need for an first-class VR experience.
The best of both worlds
The Quest two delivers a superb VR experience, no matter if you desire to play portable Quest games or PC VR titles.
Source: https://www.androidcentral.com/how-fix-common-problems-oculus-link-oculus-quest#:~:text=Quest%20Link%20randomly%20disconnects&text=In%20order%20to%20fix%20this,that%20appears%20on%20your%20headset.
0 Response to "why does oculus link keep disconnecting"
Post a Comment